Native American 3D Art Lesson Plans
Scroll down to find a variety of multicultural tribal specific ceramic lesson ideas. Each lesson incorporates Native American Culture by tribe and region, elements and principles of art, cross-curricular suggestions and materials. (more to come)
Click HERE to access my TPT account for additional lessons, rubrics and resources.
Click HERE to access my TPT account for additional lessons, rubrics and resources.
Woodland Wild Garden: Native Medicinal Plants
Grades 2-5 Tribe: Woodland
Resources-
Medicinal Plants of North America: A Field Guide (Falcon Guides)
Web sites:
http://www.nativetech.org/plantgath/plantgaht.htm
http://www.nativetech.org/lacey/index.html
http://www.wildflower.org/plants/
Resources-
Medicinal Plants of North America: A Field Guide (Falcon Guides)
Web sites:
http://www.nativetech.org/plantgath/plantgaht.htm
http://www.nativetech.org/lacey/index.html
http://www.wildflower.org/plants/
Native American Art: "Iroquoise No Face Doll" Lesson Plan
Title/Technique: Iroquois Corn Husk "No Face" Doll
This lesson uses the iroquois Museum Web site for the legend of the No Face Doll. After hearing the legend, students will discuss the lesson the story teaches. (Note that there are other versions of this legend.) They will then make their own doll to teach a life-lesson.
Tribe (s): Iroquois Region: Northeast
Cross curricular connections: Reading, Lang Arts, History
Grade(s): 4-6
Elements/Principles of art: Form, Unity, Texture
Materials:
Pencils and erasers
Tagboard or corn husks
glue
string
scrap cloth
Read the story here: https://www.oneidaindiannation.com/the-legend-of-the-no-face-doll
Description:
- Explore web page site listed above to introduce the Iroquois people.
- Read legend
- What does the story teach us?
- Can you think of other stories that teach lessons?
- Brainstorm an important life-lesson children need to learn (examples: listen to elders, sharing, helping younger others, etc.)
- How can you make a doll that would remind us all about this important lesson? What symbols would best teach us?
- Share your ideas with a classmate and refine as needed.
- Each student can draw their doll design and make notes for materials needed. Doll can be male or female.
- Make a 3-D version of your doll or a paper-doll.
- Share stories and describe the importance of the dolls they created.
Native American Art: "Mikmaq Geese Migration" Lesson Plan
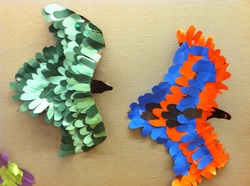
Title: The Mikmaq Geese Migration
Technique: Paper Relief Sculpture
Tribe: Mi”kmaq Region: Eastern Canada
Cross curricular connections: Social Studies, Science, Language Arts
Grade(s): 3+
Elements/Principles of art:
Free form shape, visual rhythm, unity
Materials Needed:
Bird template and sample/image of a real goose and a completed “Art bird”
Assorted construction papers
Tagboard
Scissors
Glue
pencils and erasers
Legend: http://www.firstpeople.us/FP-Html-Legends/Mikmaq_Legend_Of_The_Wild_Goose-Micmac.html
Brief Description:
A great lesson to do in the fall!
We started by reading the legend and talking about why birds migrate (food).
We discussed the sample I had prepared and how VISUAL RHYTHM was used in the feathers.
Also reviewed: Shape- free form and geometric
We used a template to trace the bird form on tag board and cut it out (see photo)
Each student chose 2 construction paper colors, no black (Black will be used to unify the flock)!
Demo how to fold paper to cut feathers.
Examine feather patterns and demo how to glue feathers from wing bottom to top in rows.
We colored the heads in black sharpie and added an eye using one of the feather colors.
The top row of feathers might need trimming.
Add black feathers in a symmetrical pattern to create UNITY in the flock.
Display in a “V” Formation.
Polar Bear Math
This lesson ideas will share a simple art project to tie into the study of the Innuit culture and legends. You will use math concepts
to direct the construction. Using fractions children will divide the clay into 1/2 and 1/4 sections. Extend by illustrating the concepts of 1/2, 1/4, 1/8, 1/16 and 1/32 if age appropriate. Click HERE former information and the lesson.
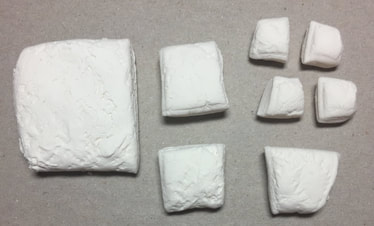
Divide the modeling clay using fractions
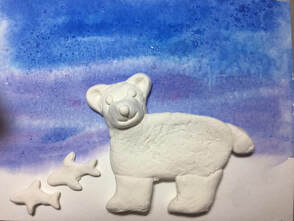
Arctic Crystal Sky with a Polar Bear
More ideas:
|
|
|
|
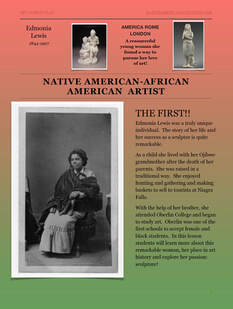
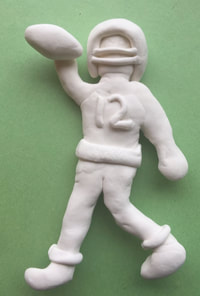
Edmonia Lewis
Ojibwe-African American Artist! Learn more about this extraordinary woman and create a relief sculpture basked on your interests. Explore the use of an all white modeling clay to mimic her use of Italian marble. CLICK HERE for the lesson plan.
|
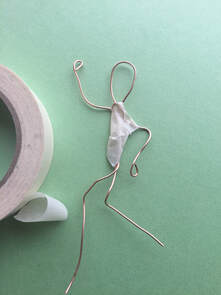
Begin with a a wire armature
|
Subject is something the student is interested in!
|
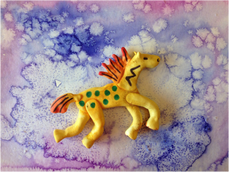
"Mud Pony" Clay Sculpture/Relief Sculpture
Grade(s): 2-3 Tribes: Skidi Pawnee
Resource/Book: The Mud Pony by Shonto Begay
Objectives: Create a clay horse part-to-whole, use math divide clay into sections
Materials Needed:
Book: Mud Pony
Air Dry Clay or Model Magic
Watercolor paints
Wood stylus
Tag Board (Relief Sculpture)
Lesson:
DAY 1
-Read Story
-Examine horse shapes
-hand out clay and divide into sections:
1 Roll into a large coil
2 Divide in half (Green line) 1/2s
3 Divide each half again (black lines) 1/4s
4 Divide 3 of the 4 sections in half again (red lines) 1/8s
Body neck/Head mane/tail front leg front leg back leg back leg
-Form body
-Add neck and head
-Add legs, make sure it stands, modify as needed
-Add mane and tail
-Use stick to add detail or modify let dry overnight,
DAY 2
Paint the next day with a water based paint- tempera or watercolor (I used watercolor with salt to create the bursts of white)
* Model Magic relief sculpture: Follow steps 1-4 and create a 2-D horse to mount on tag board, horse will not need to stand, students may add details onfront side only. Use a scissors to cut the mane and tail.
Native American Art: "Mayan Ruins" Ceramic Lesson Idea
6th grade
Native American Art: "Identity Sculpture" Ceramic Lesson Idea
8th grade
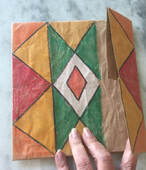
Native American Art: Pueblo Pottery Lesson Plan
Title/Technique: Pueblo Pottery
This lesson uses the Smithsonian Web site for an introduction to Pueblo Pottery. After learning about the importance and meaning of the pottery symbols, students will design their own symbols for a clay wall vase.
Tribe (s): Pueblo Region: Southwest
Cross curricular connections: Lang Arts, US History
Grade(s): 1-8
Elements/Principles of art: Shape, Symbols
Materials:
clay, small water containers, clay tools
hand out with 3” square/circle
tagboard templates of various vase shapes
newspaper
Learn about Pueblo Pottery here: http://americanhistory.si.edu/ourstory/pdf/pueblo/pueblo_explore.pdf
Description:
- Explore web page site listed above.
- Brainstorm: What natural items are important to you and your family? (examples: earth, wind, fire, water, food, animals/pets, etc)
- Choose your item/element.
- Design a symbol to represent your element. It should be roughly 3 inches. When drawing, have them make sure their design touches the side of the 3” circle/square
- Do you think other’s can ‘read’ your symbol? Share with a classmate and refine as needed.
- Prepare your wall pot;
- roll a slab of clay
- choose a pot shape template and trace it twice. Cut shapes out of clay
- On one shape, make your shape from coils or thin slabs of clay.
- Attach with scratch and wet technique.
- Join two pieces of clay together around the edges, use scratch and wet technique.
- Stuff inside of pot with newspaper.
- Poke a hole on the back pot shape to hang on wall.
- Let dry flat, the back should be flat on the table, the top slightly rounded.
- Dry, fire and paint.
- Older students could make a coil vase/pot.
- If you do not have access to clay or a kiln students could use paper or paint as well. You can also make a nice wall pocket using paper plates and paint.
As an Amazon Associate I earn from qualifying purchases.
Copyright Restrictions and the NativeAmericanActivities Web Site:
Be aware that all text and images on the Native American Activities website are Copyright Protected.
You must obtain written permission to reproduce or transmit any NativeAmericanActivities materials.
Teachers may print-out text and images without restriction for use in a non-internet classroom setting. the following statement should be included on each copy:
Copyright © 2023 Native American Projects & Lessons Plans. Internet URL: http://www.nativeamericanactivities.com